A Beginner's Guide to Craft Coffee
A Beginner’s Guide to Craft Coffee
Are you interested in making better coffee but not sure where to begin? Are you satisfied with the coffee you’re making now and wondering how much better home-brewed coffee can really get? Perhaps you’re overwhelmed by the number of options you’re given in terms of beans, brewers, grinders, etc. Either way, you’ve come to the right place. This guide is designed to make a complex subject easy to understand. It starts with a simple explanation of what “craft” or “specialty” coffee really is, it includes a gear guide designed to get you brewing great coffee without spending a fortune, and it concludes with simple instructions for brewing your first batch.
Read on. Brewing better coffee is much easier than you might think.
What is “craft” or “specialty” coffee?
Specialty coffee refers to coffee that has been scored by professional cuppers (analogous to sommeliers for wine) at 80 points or above. Such coffee is largely free of defects (broken beans, insect damage, mold/fungus, etc.) as a result of the farmer’s care and attention to detail in growing and processing the coffee. Most of this specialty coffee goes to roasters and shops who care about maintaining the quality of that crop and who roast and serve it as “single origin” coffee (rather than a blend) in order to highlight the unique characteristics of that lot. Take a look at your next bag of coffee. If it has a roast date on it, there’s a good chance it’s specialty coffee. If it has a “use by” or “best by” date, it’s probably not specialty coffee.
Craft coffee is where you come in. Craft coffee refers to the art and skill of brewing specialty coffee at home and bringing the best of that coffee to your cup. If you’re used to brewing grocery store or big chain coffee at home, you’re in for an eye opening experience. Specialty coffee has so much more to offer than the cheap, sub-specialty (< 80 point) blended coffee that you might be used to drinking. In order to get the most out of specialty coffee, however, you may need to reexamine the equipment you’re using to brew. Because much of the popular consumer coffee gear doesn’t lend itself to making specialty coffee (blade grinders have poorer grind consistency than burr grinders, cheap drip machines don’t get the water hot enough), many home brewers fail to realize the full quality of specialty coffee when they first try it at home. And that’s okay! If you enjoy the grocery store coffee you’re making today, there’s nothing wrong with that. Just know that it is possible to start making better coffee without much cost or effort.
What do I need to get into craft coffee?
Though I have a full gear guide for those looking to upgrade specific components of their craft coffee arsenal, many beginners ask me for a simple list of gear to get them started without breaking the bank. The gear below will do just that.
Grinder: JavaPresse
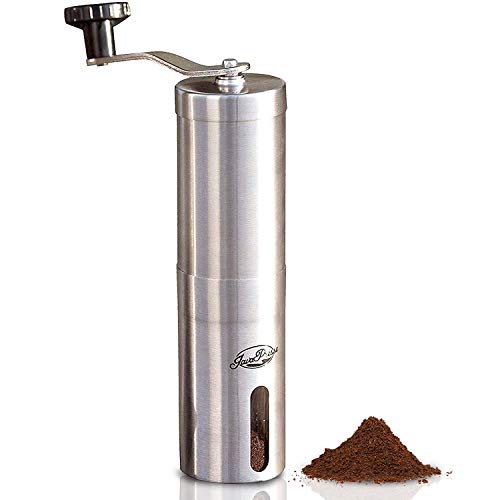
The JavaPresse is a good entry-level grinder at a great price (around $20). You’ll have to grind by hand, but it’s quiet, portable, and offers a great range of adjustment for almost any brewer. The company also offers a number of beginner guides and instructions to help get you started.
Brewer: Bodum Brazil French Press
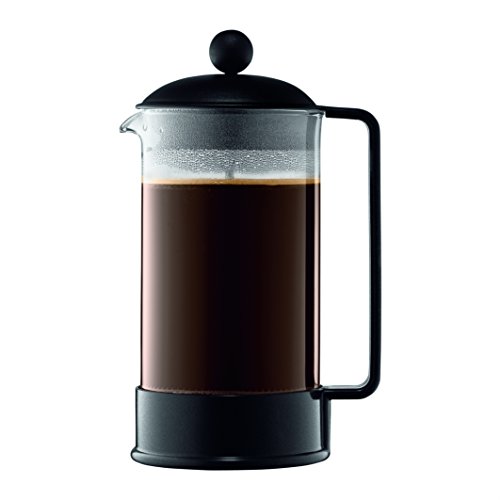
Affordable (usually under $20), easy to use, and great for mastering the art of coffee extraction. The french press is where I began my journey into craft coffee, and it is frequently recommended as a beginner brewer. Even if you move on to other brewers down the road, there’s always room for a french press in the kitchen.
Alternate consideration: if you want easier cleanup and a slightly quicker brew process, go for the Clever Dripper. Note that you’ll give up the ability to do larger batches (the Clever is only good for one or two cups at a time).
Scale: American Weigh Scales SC-2KG

Reliable, accurate, and affordable (around $20). This is a commonly recommended scale for dosing coffee. It reads to 0.1 grams, supports up to 2,000 grams, and is suitable for almost any manual brewer.
Beginners often ask if a scale is really necessary. While you can certainly dose by volume (using a tablespoon or other scoop), it is much more accurate to dose by weight. In the long run, you’re much better off dosing by weight (both coffee and water), as it will help you make good coffee more consistently. Start with a 1:17 coffee to water ratio and adjust to taste.
Kettle: Mr. Coffee Flintshire Whistling Kettle
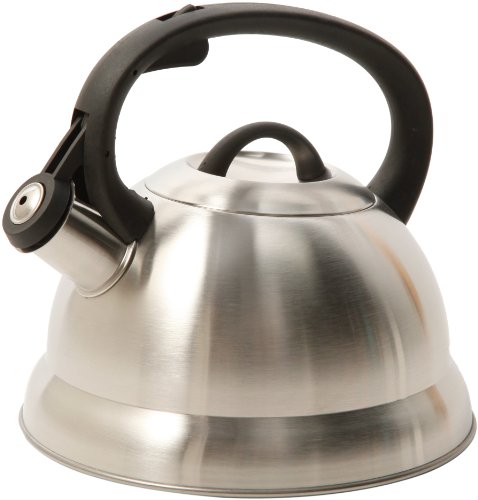
This may be the one and only Mr. Coffee device able to bring water to the proper temperature for coffee brewing (195-205°F)—with a stove, of course. Any stovetop kettle will do, but this one is cheap (around $10) and readily available from Amazon. You could spend more for a gooseneck (which will be needed if you ever want to use a pour over brewer) or for an electric model, but if you’re just getting started and want to save some money, you can’t go wrong with this kettle.
How do I brew my first batch of craft coffee?
Brewing good coffee doesn’t need to be difficult or intimidating. Follow these steps for your first batch, and soon you’ll have mastered craft coffee.
Step 1: bring water to a boil
Fill your kettle with plenty of water and put it on the stove to bring to a boil.
Step 2: dose and grind your coffee
As your kettle is heating, dose out 20 grams of whole bean coffee. Adjust your grinder to a coarse setting (approximately 15-18 clicks from closed on the JavaPresse) and grind up the coffee.
Step 3: Preheat Brewer
After the water has come to a boil, pour a little into your brewer and over the filter. This will preheat the brewer (helping it retain heat) and rinse out any papery taste from the filter (if using a paper filter brewer). Dump this water from the brewer into your cup/mug to heat it.
Step 4: Add Coffee Grounds, Tare scale
Place your brewer on the scale and tare the scale (reset it to 0 grams). Add your ground coffee to the brewer and ensure all or most of the 20 grams came out (it is common for some to be retained within the grinder). Tare the scale once more to reset it to 0 grams.
Step 5: Add Water, bloom for 30 seconds
When your kettle water has dropped to around 200-202°F (check with a thermometer if you have one, otherwise waiting a minute or two off-boil usually gets you close), start a timer and add 60 grams of water (3x coffee weight) to your brewer to allow the coffee to bloom (release CO2).
Step 6: add remaining water, Stir, and cover
After 30 seconds, add water until the scale reads 340 grams (a 17:1 water to coffee ratio). Stir the slurry (water/coffee mix) and cover the brewer to retain heat.
Step 7: wait for the coffee to extract, decant
When your timer reads 4 minutes, slowly press down on the french press filter until it hits the bottom and pour delicious coffee into your cup/mug (after dumping out the preheat water, if still in your cup). Don’t leave coffee in the french press as it will lead to over-extraction. If using the Clever Dripper, simply set the brewer on top of your cup/mug and the brewer will decant.
Step 8: taste and tweak
Taste the coffee and see what you think. Let it cool for a few minutes and taste again (coffee will generally get sweeter and show more complexity as it cools).
Over extracted coffee tends to be bitter, dry, or hollow. Try grinding coarser or brewing for a shorter period of time.
Under extracted coffee tends to be sour, tangy, sharp, or thin. Try grinding finer or brewing for a longer period of time.
Evenly extracted coffee should be sweet, ripe, rich, balanced, and complex.
The world of coffee is incredibly deep and complex—but it doesn’t have to be. Making better coffee at home is quite simple and inexpensive. Do it a few times and it quickly becomes second nature. And while the tips above are important to setting you off on your craft coffee journey, don’t forget the most important step to brewing better coffee: buying fresh roasted beans. Boettcher Beans are always roasted fresh in small, meticulously tracked batches designed to bring out the very best of each bean. To see what I’m currently roasting or to try some for yourself, visit my store page.
Note: as an Amazon Associate I earn from qualifying purchases made using the links above. Prices are the same for you, I just get a commission for helping you find the right piece of gear.